Showing posts with label neat. Show all posts

Monday, June 20, 2011

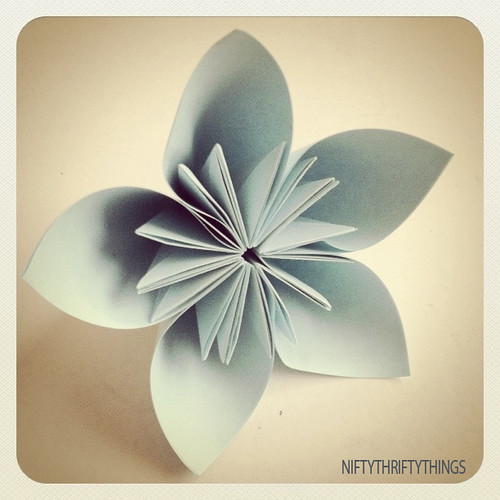
Beautiful Origami Flowers

I know, it's been a while since I posted last. I've had alot of hectic things happen in the past few weeks ending in a really bad cold I'm still trying to shake. Anyway that doesn't stop me from giving what my readers want, really neat DIY stuff! So here's the latest: A tutorial on how to craft a really beautiful origami flower (pic below). I made a bunch of these, combined them into a ball, added a vase, and viola it's stunning! Click HERE for the full tutorial thanks to nifty thrifty things.


-Mr Crafty

Wednesday, May 25, 2011

Bunting Project


Bunting projects are always fun because one: they are fairly easy and two: they make versatile decor for festive occasions and the like. You can check out Discoverpaper for a full rundown on an easy paper bunting project.


-------------------------------------------------------------------------------------------------


I'd also like to add that every spring when the nicer weather kicks into high gear I begin my prop building projects for my Halloween display for the year (yes I am a bit of a nut over Halloween) So keep a look out later because I'll be posting some DIY decor and props projects.For those who are just as enthusiastic for Halloween as I you may want to check the
Monster-List-Of-Halloween-Projects because they are by far one of the best go to sources for all DIY prop projects.


-Enjoy

Mr Crafty

Thursday, May 19, 2011

Wreath Mania!!!!

I found this neat DIY wreath project sponsored by Fiskers on their site. I especially love the fabric one. These look super easy to make and so versatile as far as home decor.

Click HERE for the full tutorial


-Mr Crafty

Tuesday, May 3, 2011

Upcycled Newspaper Gift Bags: For Your Inner Eco-Maniac


When I bought something at a store recently, the clerk handed me my purchase in a bag made from a newspaper. I liked it very much and had to make some more—thus today's DIY recycled newspaper project: gift bags made from the Wall Street Journal. You can vary the dimensions, of course, but here's what I used to create a bag that's 5" tall, 4.5" wide, and 3" deep.


Stack two sheets of newspaper on top of each other. This will be a two-ply bag for extra sturdiness.

Cut out a rectangle that's 15.5" wide and 8.25" tall. If your paper already has a fold in it, align the existing fold with one of the fold lines in the diagram below, unless you don't mind an extra fold appearing somewhere on your bag. I cut out this rectangle, then flipped the paper over so the blue area would be on the outside of the bag.


Fold a flap 1.25" down from the top. Fold a flap 2" up from the bottom. Then measure off and make vertical folds in the places shown in the diagram above. The front and back panels are 4.5" wide, the side gussets are 3" wide, and you'll need a 0.5" flap for gluing the bag together.

Cut two pieces of cardstock or chipboard to 4.25" x 1", then glue them on the widest two panels just under the top fold. These will reinforce the rim of the bag. Glue the top flap down along the length of the bag, covering the cardstock. Since the bag is two-ply, you'll need to glue both flap pieces down one at a time.


Put glue on the outside of the 0.5" tab and bring the left-most panel over to form the body of the bag, aligning the cut edge of the panel with the folded edge of the flap. Add a little more glue to make sure the outermost sheet of newsprint gets tacked down, too


Open the bag so the 2" flap is now up. Fold the short sides inward as if you were wrapping a present. If it seems easier, you could also lay the bag on its side and crease those folds against the table


Put glue on both flaps and fold them inward to form the bottom of the bag. Standing the bag upright and pressing down from the inside will help to secure them.


Cut a piece of chipboard to 4" x 2.5" and glue it to the bottom of the bag to reinforce it and hide the flaps if you want to be an overachiever.


Punch holes in the rim of the bag, adding eyelets if you like, and string some cord through the holes to form handles. Knot each end of the cord so it won't pull out through the holes.

If you want to store your bag flat, pinch the top together, fold in the sides, and bring the bottom up so that it lies flat.


-Mr. Crafty

Thursday, April 14, 2011

Mother's Day Projects: Picture Frame Jewelery Holder

Money is tight right now. But money doesn't have to stand in the way of honoring your mom (and Mother Earth). You can make a beautiful and more importantly, meaningful, gift for Mother's Day. And what mom would not be thrilled to receive an item infused with meaning made by hand from someone she loves? I now present to you the most affordable, kid friendly, customizable, super special terrific fantastic (I cant think of any other adjectives) mother's day gift to end them all!


PICTURE FRAME JEWELERY HOLDER


1) Choose an old picture frame and remove any backing. You can decorate the frame with paint, fabric or other appropriate decoration to match mom's bedroom or bathroom decor or leave it plain.


2) Cut a piece of window screen that overlaps the back of the frame 1/2 inch. (Remember when the dog charged through the screen and ripped it to shreds? If it's still lying around, here's the perfect use for it.)


3) Staple or nail the window screen to the back of the frame.


4) Screw in some cuphooks along the bottom of the frame to hold rings and/or in the top corners to hold necklaces and bracelets. Earring backs fit through the screen.


5) If you want the holder to hang, add a picture hangar to the back. Otherwise, it can sit on a small easel or rest against the wall.


Rock on mom!!!!

-Mr. Crafty

Sunday, April 10, 2011

Spring Projects: Crochet Baby Gift Ideas


The new mom or mom-to-be often finds herself with a deluge of baby clothes, diaper bags and bath supplies. These are all useful gifts, but for crafters, a more unique approach is often desired and so very appreciated.

One of the most popular ways to make baby gifts is by crocheting. With a crochet hook and some yarn, you can create all sorts of beautiful and utilitarian baby gifts. Here are a few items to consider…..

* Baby blanket - When someone mentions crocheting, the first thing that many non-crocheters think of is a baby blanket. There’s no doubt that this is one of the most popular crocheted baby gifts, and with good reason. It’s something that new parents always need, it’s easily matched to any nursery décor, and it can be passed down from generation to generation.


* Socks and booties – If you’re on a budget but want to create a useful baby gift, try crocheting some tiny socks or booties. These take very little yarn, so you may be able to make them with leftovers from other projects. If you use a thick yarn, they are perfect for keeping the little one’s feet warm during the winter.

* Clothing - Baby clothes of all types are adorable, but crocheted items are especially nice. Baby girls look adorable in crocheted dresses. Sweaters are great for boys and girls in the winter. And crocheted hats are perfect for keeping newborns’ heads warm. If you have the time, you could even create an entire matching layette set.

* Toys – Most of the time when we think of crocheted items, we picture either items we can wear or home décor. But crocheted toys make wonderful and unique baby gifts. They’re nice and soft, and as long as we don’t add any beads or other embellishments, they’re very safe for infants. Making them in bright colors and putting a rattle securely inside will stimulate baby’s mind.

* Gift baskets - A gift basket is nice for any occasion, but a crocheted basket is ideal for a baby gift. A nice, soft basket is great for holding an assortment of baby things such as bottles, bibs and bath items. And it can double as a handy caddy for mom to carry around frequently used supplies.

Crocheted baby gifts are attractive and functional, and the sentiment behind them adds to their beauty. You don’t have to be a master crocheter to create them, either. Many items can be made using only the simple single stitch. So the next time a friend or family member announces that she’s expecting a bundle of joy, get out your hook and yarn and create a gift that’s sure to be adored.


Happy Crafting!
-Mr. Crafty

Wednesday, February 16, 2011

Budget Spring Decor Idea: Flowerpot Candles


Spring is predicted to come early this year so why not start decorating early as well? Out with the old and in with the new I always say. I believe that when decorating, candles are a versatile medium. You can recreate and position them anywhere and they always look great!!!! I came across an idea of using using small terra cotta pots as candle holders which really livens up a room and gives it a garden/earthy feel perfect for spring.


Supplies

Terra Cotta Pots
Craft Paint (I used an ivory)
Sand, gravel or floral clay to hold candles
Floral Motifs from contact paper, gift wrap, wallborder or magazines.
(Optional)
Glue
Floral Moss (Optional)
Taper candle

Using a wadded up damp paper towel, dip into your paint and dab the excess off onto another paper towel. Dab the paint over the surface of the pot until you get a sponged, washed antique look. Allow to dry.

Cut out your floral motifs and brush a thin layer of glue on the back. Place onto your pot, smooth and brush another layer over the top. Repeat until you have the design you like. Brush the entire outside of the pot with glue. (You may water it down slightly) Allow to dry. (Obviously the glue won’t be necessary if you use contact paper or stickers.)

Now fill your pot half full with clean sand or gravel, and nestle the candle into the pot, supported by the sand. You may also use floral clay to secure the candle.

Finally, use a small amount of floral moss to cover the top of the pot if desired. Always make sure you are watching these candles as they burn, and do not allow candles to come into contact with any flammable material.

Easy, quick, and in an afternoon you can have creative, pretty candleholders for any occasion, perfect to bring the bloom of the seasons into your home!

Sunday, January 9, 2011

Christmas Tree Pop-up Card

Each year, like many people, I like to create a list of those whom I send my holiday greetings to and try to mail the cards asap. Each year I personally make my cards to send to my list of recipients. I feel it adds a little something extra special to the mix. Sometimes it's cheaper too! I try to not get to crazy and stick to two designs that I mass mail to everyone and their mother. This year I tried to keep things simple and wanted to show one of my designs to those who enjoy reading my blog. So below you can catch a few pictures of this year's card. It was really easy to make and I'm willing to go into how I went about doing it for those who'd like to make one (or more).


-Mr. Crafty
Related Posts Plugin for WordPress, Blogger...