Monday, June 20, 2011

Eco Friendly Multipurpose Pom Poms

Here's a nice little vid for you guys to make some beautiful paper pom poms. They're very cute and have multiple uses. You can visit the youtube page of NaturalMindSet for more great ideas.

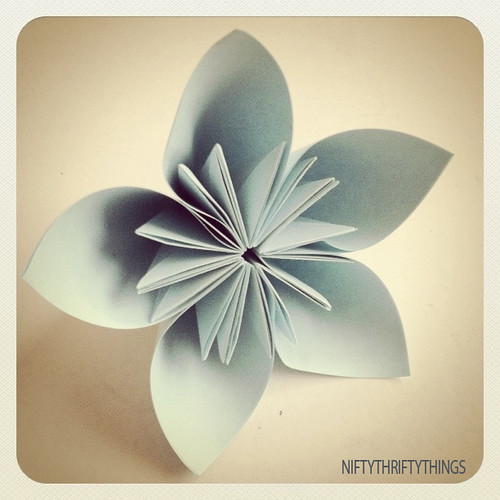
These are great for:

-Gifts
-Mobiles
-Garland
-Floral Arrangments


Have Fun
-Mr Crafty


Halloween Project: Meet the Punkin Bros.

Ok since the warm weather has got me making tons of stuff for my Halloween haunt this year I'd like to introduce my latest creation. Meet Grim:

Grim is one of two paper mache pumpkins I made. Although Grim isn't completely finished you can get an idea of what he'll look like when checking out his brother Grimey:


Grimey is older than Grim (about 2 yrs difference) This punkin was more like a test run before making the newest one. Although Grimey isn't suitable for outdoors, Grim will be which will be perfect for my Sleepy Hallow Scarecrow as I mentioned in a previous post.


-Mr Crafty

Beautiful Origami Flowers

I know, it's been a while since I posted last. I've had alot of hectic things happen in the past few weeks ending in a really bad cold I'm still trying to shake. Anyway that doesn't stop me from giving what my readers want, really neat DIY stuff! So here's the latest: A tutorial on how to craft a really beautiful origami flower (pic below). I made a bunch of these, combined them into a ball, added a vase, and viola it's stunning! Click HERE for the full tutorial thanks to nifty thrifty things.


-Mr Crafty

Friday, June 10, 2011

"Holy Crap!" Deal of the Day

I found a recent deal too good to pass up and wanted to share it with you guys thanks to Hip2Save.


"Modnique is currently hosting the Totally Bamboo Sales Event where you can save as much as 43% off the retail price! Even better, all orders at Modnique.com ship FREE within the United States (no coupon code needed!) …AND even sweeter, first time members instantly receive a $5 credit when they sign up here!! Once you have signed up/logged in, click on “All Sales Events” and then scroll down the page until you see the Totally Bamboo Sale."


Totally Bamboo Small Cutlery Tray $12 + FREE shipping
Use the $5 credit you will receive as new member
Final Cost $7! (This retails for $17!)

Totally Bamboo GreenLight Utility Board $13 + FREE shipping
Use the $5 credit you will receive as new member
Final Cost $8! (This retails for $21!)

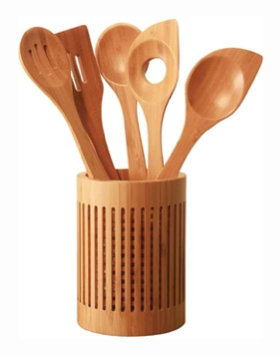
Totally Bamboo 6 piece Utensil Set $31 + FREE shipping
Use the $5 credit you will receive as new member
Final Cost $26! (This retails for $52!)


-Mr Crafty

Root Beer Pork Chops


Yea, I thought the same thing. Root Beer and Pork? So I gave it a shot and it was surprisingly good. They complement each other very well. If you head on over to Weekly Meal Deal you can find the full recipe and details.


Hint: If you are a frequent target shopper you can snag Hormel Pork Chops for 3.49lb this week and Pepsi Product 12 Packs are Buy 3 Get 1 Diet Pepsi Free. This should save you some $$ when buying the stuff you need for this meal.


-Mr Crafty

Wednesday, June 8, 2011

Warm Weather Means Halloween Time!!!

As most of you can tell by now I am a Halloween fanatic. I start during the summer each year to build my props and decorations for the season. As I promised, I will start posting tutorials on what I'm making. Hopefully this will get your creative juices flowing and you will concoct props of your own. Feel free to post a comment on what you are doing this year and share your ideas. It's a Halloween free-for-all!!


I will begin my prop posts with my first prop I made for the season. This is a scarecrow constructed much like the one from the film Sleepy Hallow. It was super cheap and adds great character to your haunt. You can find the full tutorial HERE from Halloweenforum.com


-Mr Crafty

Tuesday, June 7, 2011

Finally Up on Etsy!!!


For those of you interested in purchasing any of Mr. Crafty's goods you can now head over to Etsy at this link and buy them!!! After a long debate, I decided to jump on the bandwagon with my fellow crafters and see what Etsy has to offer. Besides, ebay was becoming more problematic than convenient.


Take Care
-Mr Crafty

Monday, May 30, 2011

Cherry Blossom Lights

I hope that everyone had a safe and wonderful Memorial Day! Mine was great. I spent a week in another state down south with my closest family. Family is really what matters in the end I always say. Anywho, I found this great tutorial for you guys to take a gander at. It is a project for making cherry blossom lights in an elegant vase. You can find the full tutorial HERE. Thanks to ChrysN via Instructables.com


Take Care

-Mr Crafty

Saturday, May 28, 2011

Sticks and Stones Will Hold My Candles


Lately I've been busy working on some unique home creations. I'm always doing some kind of DIY project around the house. I photographed my latest DIY to share with you. These small decorative votives are really easy to make. You can easily get a dozen (or maybe more) done as a weekend project. Hope this inspires my fellow crafters!


Materials:

candle holder with flat sides (any size)

craft adhesive– multi-purpose for wood and glass surfaces

garden pruners

dry tree or shrub branches


Step 1. Wash the candle holder with dish soap and dry well. Cut the branches down to sticks close to the height of the candle holder, it is best to cut a few at a time.


Step 2. Dab the glue on a stick making sure to hit the areas that will be flush to the glass. Place on the glass. You can do a few at a time and then hold until they won’t slide off before you rotate the holder.


Step 3. Repeat until all of the glass has been covered. As always, if using a candle holder do not leave these unattended! Cant you just see a whole collection of these illuminating a cozy room?


-Mr Crafty

Friday, May 27, 2011

Homemade Greek Frozen Yogurt


With Greek yogurt becoming a huge fad now because of it's lower caloric content and higher protein levels I thought it would be relevant to post this awesome recipe for vanilla frozen yogurt made with, you guessed it, Greek yogurt. This is a whole lot healthier than any other ice cream and the perfect dessert for those sweltering dog days of summer.

This recipe from David Lebovitz’s cookbook, The Perfect Scoop, gave me the perfect opportunity to try Greek yogurt out in frozen form. And. It. Is. Awesome! I love how creamy the frozen yogurt is, and it tastes great with just about any ice cream topping


From The Perfect Scoop by David Lebovitz
Makes about 1 quart (1 liter)

3 cups (720 g) plain Greek yogurt (either whole-milk, lowfat, or nonfat)
1 cup (200 g) sugar
1 teaspoon vanilla extract

1. Mix together the yogurt, sugar, and vanilla. Stir until the sugar is completely dissolved. Refrigerate for 1 hour.
2. Freeze in your ice cream maker according to the manufacturer’s instructions.


-Mr Crafty

Wednesday, May 25, 2011

Bunting Project


Bunting projects are always fun because one: they are fairly easy and two: they make versatile decor for festive occasions and the like. You can check out Discoverpaper for a full rundown on an easy paper bunting project.


-------------------------------------------------------------------------------------------------


I'd also like to add that every spring when the nicer weather kicks into high gear I begin my prop building projects for my Halloween display for the year (yes I am a bit of a nut over Halloween) So keep a look out later because I'll be posting some DIY decor and props projects.For those who are just as enthusiastic for Halloween as I you may want to check the
Monster-List-Of-Halloween-Projects because they are by far one of the best go to sources for all DIY prop projects.


-Enjoy

Mr Crafty

Tuesday, May 24, 2011

Free Chocolate From Lindt After Joining Their "Excellence Club"

I am a madman for freebies and deals on the net. I also scout around and press my luck with sweepstakes' too. I wanted to share my latest find with my readers.


"Lindt Chocolate is searching for 150 passionate dark chocolate lovers to become part of the “Excellence Influencers Club” to receive select products and perks as well as sample particular Excellence recipes in exchange for giving honest feedback! Sounds good to me as I LOVE chocolate… especially Lindt chocolate! Interested? Head on over to the Lindt Chocolate USA Facebook page, “like” them and click on the “Fans only” tab to apply! "


Thanks from Hip2Save


-Mr Crafty

Saturday, May 21, 2011

Cake Frosting: A Healthy Alternative


So the other day I made a batch of cupcakes. Whenever I bake I try to be as health conscious as I can. I usually substitute apple sauce for oil, use egg whites, margarine, etc. So back to the cupcakes, I made them and they came out awesome. I was so happy with how light and fluffy they were coming from a boxed recipe (I used Duncan Hines brand cake mix, the classic white kind) once they cooled they were ready to frost. Then came my dilemma. I knew slathering frosting from the can was going to eliminate any health conscious efforts I made. Therefore I scoured the internet and found a great new recipe that will be a standard from now on in my books. It is made from Greek yogurt (A new food apparently taking the world by storm I guess) and it has such a wonderful tang with a touch of sweet. I recommend it for those preparing for a sleeker and slimmer summer bod!!! You can find the full recipe HERE courtesy of Cup Cake Project.


-Mr Crafty

Thursday, May 19, 2011

Wreath Mania!!!!

I found this neat DIY wreath project sponsored by Fiskers on their site. I especially love the fabric one. These look super easy to make and so versatile as far as home decor.

Click HERE for the full tutorial


-Mr Crafty

Tuesday, May 3, 2011

Upcycled Newspaper Gift Bags: For Your Inner Eco-Maniac


When I bought something at a store recently, the clerk handed me my purchase in a bag made from a newspaper. I liked it very much and had to make some more—thus today's DIY recycled newspaper project: gift bags made from the Wall Street Journal. You can vary the dimensions, of course, but here's what I used to create a bag that's 5" tall, 4.5" wide, and 3" deep.


Stack two sheets of newspaper on top of each other. This will be a two-ply bag for extra sturdiness.

Cut out a rectangle that's 15.5" wide and 8.25" tall. If your paper already has a fold in it, align the existing fold with one of the fold lines in the diagram below, unless you don't mind an extra fold appearing somewhere on your bag. I cut out this rectangle, then flipped the paper over so the blue area would be on the outside of the bag.


Fold a flap 1.25" down from the top. Fold a flap 2" up from the bottom. Then measure off and make vertical folds in the places shown in the diagram above. The front and back panels are 4.5" wide, the side gussets are 3" wide, and you'll need a 0.5" flap for gluing the bag together.

Cut two pieces of cardstock or chipboard to 4.25" x 1", then glue them on the widest two panels just under the top fold. These will reinforce the rim of the bag. Glue the top flap down along the length of the bag, covering the cardstock. Since the bag is two-ply, you'll need to glue both flap pieces down one at a time.


Put glue on the outside of the 0.5" tab and bring the left-most panel over to form the body of the bag, aligning the cut edge of the panel with the folded edge of the flap. Add a little more glue to make sure the outermost sheet of newsprint gets tacked down, too


Open the bag so the 2" flap is now up. Fold the short sides inward as if you were wrapping a present. If it seems easier, you could also lay the bag on its side and crease those folds against the table


Put glue on both flaps and fold them inward to form the bottom of the bag. Standing the bag upright and pressing down from the inside will help to secure them.


Cut a piece of chipboard to 4" x 2.5" and glue it to the bottom of the bag to reinforce it and hide the flaps if you want to be an overachiever.


Punch holes in the rim of the bag, adding eyelets if you like, and string some cord through the holes to form handles. Knot each end of the cord so it won't pull out through the holes.

If you want to store your bag flat, pinch the top together, fold in the sides, and bring the bottom up so that it lies flat.


-Mr. Crafty

Thursday, April 28, 2011

Mason Jar Lanterns


I was navigating the net earlier and came across a recent DIY project that I couldn't resist. What I found was a versatile piece of decor you can use in or outdoors. I'm talking lanterns people. These are super easy to make, eco friendly, and used as an accent piece anywhere! You can head on over to Make-it-do.com for the full tutorial. I myself will be using these in my garden and yard as warm accents for low level lighting as well as a potential additive for my Halloween display.

Enjoy
-Mr. Crafty

Thursday, April 14, 2011

Mother's Day Projects: Picture Frame Jewelery Holder

Money is tight right now. But money doesn't have to stand in the way of honoring your mom (and Mother Earth). You can make a beautiful and more importantly, meaningful, gift for Mother's Day. And what mom would not be thrilled to receive an item infused with meaning made by hand from someone she loves? I now present to you the most affordable, kid friendly, customizable, super special terrific fantastic (I cant think of any other adjectives) mother's day gift to end them all!


PICTURE FRAME JEWELERY HOLDER


1) Choose an old picture frame and remove any backing. You can decorate the frame with paint, fabric or other appropriate decoration to match mom's bedroom or bathroom decor or leave it plain.


2) Cut a piece of window screen that overlaps the back of the frame 1/2 inch. (Remember when the dog charged through the screen and ripped it to shreds? If it's still lying around, here's the perfect use for it.)


3) Staple or nail the window screen to the back of the frame.


4) Screw in some cuphooks along the bottom of the frame to hold rings and/or in the top corners to hold necklaces and bracelets. Earring backs fit through the screen.


5) If you want the holder to hang, add a picture hangar to the back. Otherwise, it can sit on a small easel or rest against the wall.


Rock on mom!!!!

-Mr. Crafty

Sunday, April 10, 2011

Spring Projects: Crochet Baby Gift Ideas


The new mom or mom-to-be often finds herself with a deluge of baby clothes, diaper bags and bath supplies. These are all useful gifts, but for crafters, a more unique approach is often desired and so very appreciated.

One of the most popular ways to make baby gifts is by crocheting. With a crochet hook and some yarn, you can create all sorts of beautiful and utilitarian baby gifts. Here are a few items to consider…..

* Baby blanket - When someone mentions crocheting, the first thing that many non-crocheters think of is a baby blanket. There’s no doubt that this is one of the most popular crocheted baby gifts, and with good reason. It’s something that new parents always need, it’s easily matched to any nursery décor, and it can be passed down from generation to generation.


* Socks and booties – If you’re on a budget but want to create a useful baby gift, try crocheting some tiny socks or booties. These take very little yarn, so you may be able to make them with leftovers from other projects. If you use a thick yarn, they are perfect for keeping the little one’s feet warm during the winter.

* Clothing - Baby clothes of all types are adorable, but crocheted items are especially nice. Baby girls look adorable in crocheted dresses. Sweaters are great for boys and girls in the winter. And crocheted hats are perfect for keeping newborns’ heads warm. If you have the time, you could even create an entire matching layette set.

* Toys – Most of the time when we think of crocheted items, we picture either items we can wear or home décor. But crocheted toys make wonderful and unique baby gifts. They’re nice and soft, and as long as we don’t add any beads or other embellishments, they’re very safe for infants. Making them in bright colors and putting a rattle securely inside will stimulate baby’s mind.

* Gift baskets - A gift basket is nice for any occasion, but a crocheted basket is ideal for a baby gift. A nice, soft basket is great for holding an assortment of baby things such as bottles, bibs and bath items. And it can double as a handy caddy for mom to carry around frequently used supplies.

Crocheted baby gifts are attractive and functional, and the sentiment behind them adds to their beauty. You don’t have to be a master crocheter to create them, either. Many items can be made using only the simple single stitch. So the next time a friend or family member announces that she’s expecting a bundle of joy, get out your hook and yarn and create a gift that’s sure to be adored.


Happy Crafting!
-Mr. Crafty

Thursday, February 24, 2011

Budget Spring Decor Idea: Thrifty Stylized Bulletin Board

Fun, festive, and cheap – just the way I like doing home decor!

This project takes 5-10 minutes, and only cost me $5.25 – $5 for the frame at a thrift store and $0.25 for the bulletin board at a thrift store. Not bad, eh?


YOU WILL NEED:

- An old bulletin board, big enough to fit your frame

- Any picture frame you think is interesting or beautiful (NOTE: make sure it has a front-to-back depth large enough to contain the thickness of the cork board you will be using.)

- A tape measure

- Pencil

- Some kind of cutting device (I ended up using a bread knife.)


Directions

1. Measure the inside of your picture frame. Give yourself more room to work with than the tape measure says: for example, if one length of the inside of the frame is 10″, actually use a measurement of 9 3/4″ or something of the like.


2. If there is any kind of border around your bulletin board, snip and pull it off.


3. Using a ruler, trace out the (adjusted) dimensions of your picture frame onto the bulletin board.


4. Cut along the lines you drew. You may have to shave off a bit more from one side or the other if it doesn’t quite fit into your picture frame. Once you get it in the frame, fold down the metal flaps (or staples, etc. – whatever would usually hold the glass, photograph and backing into the frame) to hold the cork board in place.


And just like that you're done!!!!!! Here's my finished product.


-Mr. Crafty

Wednesday, February 16, 2011

Budget Spring Decor Idea: Flowerpot Candles


Spring is predicted to come early this year so why not start decorating early as well? Out with the old and in with the new I always say. I believe that when decorating, candles are a versatile medium. You can recreate and position them anywhere and they always look great!!!! I came across an idea of using using small terra cotta pots as candle holders which really livens up a room and gives it a garden/earthy feel perfect for spring.


Supplies

Terra Cotta Pots
Craft Paint (I used an ivory)
Sand, gravel or floral clay to hold candles
Floral Motifs from contact paper, gift wrap, wallborder or magazines.
(Optional)
Glue
Floral Moss (Optional)
Taper candle

Using a wadded up damp paper towel, dip into your paint and dab the excess off onto another paper towel. Dab the paint over the surface of the pot until you get a sponged, washed antique look. Allow to dry.

Cut out your floral motifs and brush a thin layer of glue on the back. Place onto your pot, smooth and brush another layer over the top. Repeat until you have the design you like. Brush the entire outside of the pot with glue. (You may water it down slightly) Allow to dry. (Obviously the glue won’t be necessary if you use contact paper or stickers.)

Now fill your pot half full with clean sand or gravel, and nestle the candle into the pot, supported by the sand. You may also use floral clay to secure the candle.

Finally, use a small amount of floral moss to cover the top of the pot if desired. Always make sure you are watching these candles as they burn, and do not allow candles to come into contact with any flammable material.

Easy, quick, and in an afternoon you can have creative, pretty candleholders for any occasion, perfect to bring the bloom of the seasons into your home!

Wednesday, February 2, 2011

Super Savings!!!!!

As an avid coupon clipper, I get many of my coupons from online sources. Be sure to check out my list of recent coupon finds below:


Save up to $15 in A&H coupons click here


Click hereto print your weekly coupons for AC Moore:

- 40% off any one Regular Priced Item
- 55% off Frame Shop

Coupons valid 1/30/11 - 2/5/11.


Click here to print your coupon for - Buy 1 Entree Get the 2nd One 1/2 off. Coupon expires 2/8/11.


Happy clipping
-Mr. Crafty

Tuesday, January 25, 2011

Make Your Vanentine's Day Special With A Candy Card

February 14 is right around the corner and for the hopeless romantics out there, I've got a creative project to show that special someone you really care about them.


Stuff you'll need:
Cardstock
Tissue paper
Individually wrapped chocolates (I use heart ones)
Chenille stems or small strips of paper
Double sided tape
Various embellishments of choice.


To create the card, cut a horizontal sheet of paper from left to right (ending up with two long strips of paper). Fold one in half. Cut a 3 x 3 sheet of tissue paper and fold into funnel shape then secure to the card with a piece of double stick tape. Using tape, attach either paper or chenille stems of the flowers into the wrapper first and then glue on the chocolate pieces. Attach rectangles of complementary colored paper to the cover and inside with more double stick tape. Finally, embellish the card with your own Valentine's Day sentiment!


Enjoy
-Mr. Crafty

Saturday, January 22, 2011

The #1 Superbreakfast of the Year

What did your breakfast consist of this morning? I had some whole grain cereal and 2% milk. Sounds pretty healthy. In reality I could have done a lot worse, except by the time I got into work, I was famished. Then came what I call my “second breakfast,” when I’m suddenly gorging my face full of whatever I can grab to curb my hunger. Since it’s a new year, and I’d like to get things off to a good start, I think it’s time for a new breakfast. But what to eat? Oatmeal is as close to perfect as you can get for a breakfast food.


It’s got 4 grams of fiber per cup and research suggests that increasing your intake of soluble fiber (a type of fiber found in oatmeal) by 5 to 10 grams each day could result in a 5 percent drop in “bad” LDL cholesterol. If I top it with fruit, like 1/4 cup of raspberries for example, it’s not only delicious, but I also tack on an additional 2 grams of fiber. That means I’m well on my way to that extra 5 to 10 grams of fiber with just my breakfast. AND it could help you lose weight in two ways. One, all that wonderful fiber makes you feel fuller longer, so sorry, second breakfast, you are no longer necessary. Two, according to a recent study in the Journal of Nutrition, eating a breakfast made with “slow-release” carbohydrates, such as oatmeal, 3 hours before you exercise may help you burn more fat. Here’s why: in the study, eating “slow-release” carbohydrates didn’t spike blood sugar as high as eating refined carbohydrates, such as white toast. In turn, insulin levels didn’t spike as high, and because insulin plays a role in signaling your body to store fat, having lower levels may help you burn fat. So oatmeal will be tough to beat for breakfast this year. Convinced it should be your breakfast go-to? Quick, tasty and helping me to stay slim? I’m sold.


Here’s a simple way to make a bowl of oatmeal, and some topping suggestions to make it tasty:

Bring 1 cup of water (or nonfat or low-fat milk) and a pinch of salt to a boil in a small saucepan. Stir in 1/2 cup quick-cooking oats and reduce the heat to medium; cook for 1 minute. Remove from the heat, cover and let stand for 2 to 3 minutes.

Here are some topping suggestions:
Dried fruit
Cinnamon
Toasted nuts
Fresh fruit
Plain yogurt
Jam
Applesauce
Ground flaxseed

Monday, January 17, 2011

Green Tea: Reasons Why You Should Consume It Daily

Tea is one craze that is taking the nation by storm. Medical science has found many beneficial health effects from daily consumption of tea. This is particularly because teas are rich in antioxidants. For those who don't know, An antioxidant is a molecule capable of inhibiting the oxidation of other molecules. Oxidation is a chemical reaction that transfers electrons from a substance to an oxidizing agent. Oxidation reactions can produce free radicals. In turn, these radicals can start little chain reactions that damage cells. Antioxidants terminate these chain reactions by removing free radical intermediates, and inhibit other oxidation reactions. You know how when metal rusts, oxidation occurs? It's much like this principle where cells are being oxidized like metal and begin to deteriorate like rust. So in plain, tea has this stuff in it and it's really good for you.


Here are nine reasons to start consuming green tea or continue drinking it if you’re already hooked.

1. Green tea is a superb fat fighter. Its active ingredient, EGCG, increases the rate at which fat is burned in your body.

2. It targets belly fat. Research at Tufts University indicates that EGCG in green tea, like other catechins, activate fat-burning genes in the abdomen to speed weight loss by 77 percent.

3. Green tea keeps energy stable by balancing blood sugar levels. EGCG improves insulin use in the body to prevent blood sugar spikes and crashes that can result in fatigue, irritability, and cravings for unhealthy foods.

4. Research shows it may be helpful against lung cancer. In an April 2010 study published in Cancer Prevention Research, EGCG was found to suppress lung cancer cell growth.

5. Green tea may halt colorectal cancer. In numerous other studies, EGCG appears to inhibit colorectal cancers.

6. In research, it appears to cause prostate cancer cells to commit suicide. A March 2010 study in Cancer Science indicated that EGCG aids the body by causing prostate cancer cells to commit suicide.

7. Green tea may prevent skin damage and wrinkling. EGCG appears to be 200 times more powerful than vitamin E at destroying skin-damaging free radicals. Free radicals react with healthy cells in the body, causing damage, so lessening their numbers may help reduce wrinkling and other signs of aging.

8. It contains a potent antioxidant that kills free radicals. Because it is a potent antioxidant green tea can positively impact a lot more than skin cells. Free radicals are increasingly linked to many serious chronic illnesses like arthritis, diabetes, and cancer.

9. Green tea tastes awesome. If you’re not crazy about the flavor, mix it up with another tea. Try it cold or hot. Add some of the natural herb stevia to sweeten it if you want a sweeter drink. I wasn’t crazy about green tea the first few times I tried it, but now I love it with a fresh squeeze of lemon and a few drops of stevia over ice -- et voila! Green tea lemonade. Yummmm.


Reap those rewards
Add one or two teaspoons of green tea leaves to a cup of boiling water, preferably in a tea strainer. Let steep for five minutes. Pour over ice if you prefer a cold beverage. Most experts recommend three cups a day. And, don’t worry, green tea contains a lot less caffeine than coffee or black tea.


Here's to your health, a cup at a time

-Mr. Crafty

Saturday, January 15, 2011

Banana Split French Toast

Ok, I've been posting alot of healthier foods to slim down your waistline after recovering from the holidays. But everyone needs indulgence, and I mean complete indulgence, once in a while. That's a golden rule of dieting, don't deprive yourself. You need to splurge every once in a while to keep your system in check. So why not splurge on a breakfast item that will burn up many of your daily calories? I recently found a recipe that crosses french toast and a banana split all on one plate! Sounds too good to be true huh? Well it isn't. So grab yourself all the fixins for plain old french toast, and I’ll show you how to transform it into this party of a breakfast in two shakes of a clown’s nose.


Banana Split French Toast

  • 1 very ripe banana
  • 2 eggs
  • 6 slices Texas Toast
  • Simply Chocolate Syrup (see below)
  • 1 cup whipped cream
  • sprinkles
  • maraschino cherries

Heat a griddle or skillet pan to medium heat. In a blender, puree the eggs and banana together. Pour into a shallow baking dish. Dip both sides of the Texas Toast into the banana puree and grill until golden brown. Serve drizzled with Simple Chocolate Syrup and a dollop of whipping cream. Top with maraschino cherries & sprinkles.


Simple Chocolate Syrup

  • 2 cups sugar
  • 2/3 cup water
  • 1/3 cup cocoa powder
  • 1 teaspoon vanilla
  • 2 tablespoons butter

In a small pot, stir together all ingredients over medium heat until sugar has dissolved. Serve warm over Banana Split French Toast.


-Mr. Crafty

Tuesday, January 11, 2011

Easy Peasy Valentine Wreath

February is right around the corner and the season of love is knocking. Why not start your valentine decorating a little early this year with a handmade heart wreath? They are so easy to make and so effective. I made quite a few to put around the house. This is an awesome project for little ones too, with some supervision of course.


Here's a list of materials you'll need:

String or Yarn for hanging

Glue

Heart Pattern

Colored paper (I used valentine's day themed colors like red, white, pink, and purple)

Scissors

Paper Plate


Directions

1. Cut a lot of small hearts of different sizes from the color or colors of construction paper of your choice.

2. Cut out the middle of a paper plate, leaving the rim.

3. Glue your hearts all around the paper plate to form your wreath.

4. You can tie a ribbon on it if you wish, or hang string to the back to hang from a nail or hook.


Here's what the finished product should look like:


-Mr. Crafty

Monday, January 10, 2011

New Year Food Find #4: Punkin Muffins

Though Thanksgiving is done and over with thank god, I still love the flavors that surface during that time. Apples, cinnamon, spices, and cookies are just to name a few scents filling the air. But who honestly can forget pumpkin. I am a freak over pumpkin anything. It's such a good earthy flavor to work with when baking and cooking. Alot of the dishes that have pumpkin in it may first seem like a healthier choice but in reality it's not. Pumpkin pie, Pumpkin cheesecake, and pumpkin bread pudding are just as bad as their counterparts. It is the pumpkin muffin that really calls my name come holiday season. They are so horrible for you but so good. I wanted to find a way to eat my seasonal pumpkin muffins without turning into one myself!!! So I found this recipe to ease my hunger pangs. Enjoy!!!!


HG's Punkin' Muffins


Ingredients:
Muffins
1 cup Fiber One Original bran cereal
1 1/2 cups whole-wheat flour
1/2 cup Splenda No Calorie Sweetener (granulated)
1/4 cup brown sugar (not packed)
1 tbsp. baking powder
2 tsp. cinnamon
1/2 tsp. pumpkin pie spice
1/4 tsp. salt
One 15-oz. can pure pumpkin
1 cup club soda
1/2 cup fat-free liquid egg substitute (like Egg Beaters Original)
1/4 cup sugar-free pancake syrup
1 tsp. vanilla extract
1/4 cup raisins, chopped

Icing
1/4 cup Cool Whip Free, thawed
3 tbsp. fat-free cream cheese, room temperature
1 tbsp. Splenda No Calorie Sweetener (granulated)

Directions:
Preheat oven to 350 degrees. Line 10 cups of a 12-cup muffin pan with baking cups and/or spray with nonstick spray. Set aside.

Using a blender or food processor, grind cereal to a breadcrumb-like consistency. Transfer crumbs to a large bowl.
 Add flour, Splenda, brown sugar, baking powder, cinnamon, pumpkin pie spice, and salt. Mix well and set aside.

In another bowl, combine pumpkin, soda, egg substitute, syrup, and vanilla extract. Mix thoroughly. Add mixture to the large bowl and stir until blended to form the batter.

Slowly sprinkle and stir chopped raisins into the batter. Evenly distribute batter among the 10 prepared cups of your muffin pan. (Batter may be piled high... This is OK!)

Bake in the oven until muffins are golden brown and a toothpick inserted into the center of one comes out mostly clean, about 30 minutes. Set aside to cool.

Meanwhile, combine all icing ingredients in a small microwave-safe bowl. Mix until smooth and blended. (Refrigerate icing if you don't plan to serve muffins right away.)

Remove cooled muffins from the pan. Just before serving, warm icing in the microwave for a few seconds and drizzle it onto the muffins (or simply spread it on evenly). Enjoy!

MAKES 10 SERVINGS


These baby's save over 300 calories a serving!!! The ones I make are usually without the icing (as the photo shows). Also, you can try different variations for the club soda using other types of soda. To save the calories make it diet. I once used vanilla cream diet soda in the mix and it turned out wonderful!!!!


-Mr Crafty


Sunday, January 9, 2011

Christmas Tree Pop-up Card

Each year, like many people, I like to create a list of those whom I send my holiday greetings to and try to mail the cards asap. Each year I personally make my cards to send to my list of recipients. I feel it adds a little something extra special to the mix. Sometimes it's cheaper too! I try to not get to crazy and stick to two designs that I mass mail to everyone and their mother. This year I tried to keep things simple and wanted to show one of my designs to those who enjoy reading my blog. So below you can catch a few pictures of this year's card. It was really easy to make and I'm willing to go into how I went about doing it for those who'd like to make one (or more).


-Mr. Crafty

Saturday, January 8, 2011

DIY Coupon Organizers

If you are an avid coupon clipper like I am then you can understand the frustration of having coupons in one giant pile that you'll later have to dig through as you enter checkout. When I first started clipping, I did this and soon after regretted it. I actually lost money by doing this because coupons will frequently expire if not organized properly. So, I finally had enough and created my own organizer that makes things easier. Here's a tip for those of you who are organizing coupons for the first time: You want to make sure they are sorted according to your needs/and or grocery store. So if you can, chunk them into categories that are concurrent with the aisles in your grocery store. I did mine like this:

Household Msc.
Frozen
Cereal/Juice/Breakfast
Canned Goods/Pasta/Ethnic
Meat/Dairy
Baking/Dressing/Spices
Snacks/Chips/Crackers
Tea/Coffee/Bread

Once sorted, you need a place to keep the coupons neat and orderly. There are a few different methods to creating coupon organizers. It all depends on the portability and cost that you prefer.

  • Binder - Many people use and swear by the binder system. How it works is you take a regular three ring binder and add clear sectioned sheets to hold your coupons. People like this because it allows flexibility of how many categories they can break their coupons down into. Tip: to save money and frustration, make sure you sort the coupons by expiration date so that none get thrown away.
  • Recipe box/tupperware - Many people like this method as well because it's a little less costly than the binder system. Basically you use the box as a holder and organize the coupons inside through use of index cards.
  • Envelope - This is my personal favorite and what I use for my coupons because it's effective and cheaper to build. You're basically connecting multiple envelopes to make an accordion style holder for your coupons. The project below is to build your own accordion style envelope coupon holder.


HOW TO MAKE YOUR OWN ACCORDION STYLE COUPON ORGANIZER


THINGS YOU'LL NEED
:

Hot Glue Gun
Cardstock
Ribbon
Envelopes (All the same size)
Glue


DIRECTIONS:

Lay two envelopes face down, with flaps open


Apply glue to the flap of the second envelope. Paste the flap on the front of the first envelope, creating a chain of envelopes with their flaps glued to the previous envelope. Be careful to keep them perfectly straight.

After you have added all the envelopes you need, it is time to make the cover. Using an open envelope as a pattern, cut a slightly larger shape, including the flap, out of cardstock. Glue this to the front of your first envelope

Starting at the beginning, fold up the first envelope so that you see the front of that second envelope. Now fold the next envelope the opposite way so you see the back. Continue to do this until you reach the end. It tends to work best if you see the front of the last envelope so that no coupons fall out. If you need to add one more envelope to finish yours this way then do so.

Cut a length of ribbon long enough to wrap around your entire organizer. Hot glue a section of the ribbon to the back of the organizer. Leave the rest loose for easy tying. Then write your categories on each envelope, and you're finished. My homemade organizer has lasted over a year


Happy couponing!
-Mr.Crafty

Thursday, January 6, 2011

New Year's Food Find #3: Black Bean Burgers

Imagine sinking your teeth into a fully loaded juicy hamburger. Now picture sinking your teeth into a piece of fat shaped into a hamburger with about 10tbsp of salt, sugar, and more fat on top. Doesn't sound appetizing huh. Unfortunately many burger joints deliver this to their customers with a side of fried something and a cup of sugar water. People in America are addicted to fast food and burgers fall into this category. But honestly, who can resist a really good burger prepared in just the right way? Even though the temptation is strong, many people people turn away a good burger for the sake of the calories. Here's where my New Year Food Find #3 comes into play. Black beans are mashed and shaped into patties resulting in a tasty meal that has just about the same amount of protein of a burger and 75% less calories. The best thing about this recipe is it's versatility. I've prepared this in so many different ways from Sunday. The way the recipe below approaches it is from southwestern style cooking. Enjoy!


Black Bean Veggie Burgers

Ingredients

  • 1 (16 ounce) can black beans, drained and rinsed
  • 1/2 green bell pepper, cut into 2 inch pieces
  • 1/2 onion, cut into wedges
  • 3 cloves garlic, peeled
  • 1 egg
  • 1 tablespoon chili powder
  • 1 tablespoon cumin
  • 1 teaspoon Thai chili sauce or hot sauce
  • 1/2 cup bread crumbs

Directions

  1. If grilling, preheat an outdoor grill for high heat, and lightly oil a sheet of aluminum foil. If baking, preheat oven to 375 degrees F (190 degrees C), and lightly oil a baking sheet.
  2. In a medium bowl, mash black beans with a fork until thick and pasty.
  3. In a food processor, finely chop bell pepper, onion, and garlic. Then stir into mashed beans.
  4. In a small bowl, stir together egg, chili powder, cumin, and chili sauce.
  5. Stir the egg mixture into the mashed beans. Mix in bread crumbs until the mixture is sticky and holds together. Divide mixture into four patties.
  6. If grilling, place patties on foil, and grill about 8 minutes on each side. If baking, place patties on baking sheet, and bake about 10 minutes on each side.


-Mr. Crafty

Saturday, January 1, 2011

New Year's Food Find #2: Brownies

Ok so we've all stuffed ourselves of some form of baked good this holiday season and now it's time to wise up. So I'd like to introduce you to the second food find in My New Year's Food Finds series; Brownies. These brownies are about half the calories, only two ingredients, and cheaper to make. I'm sure I got your attention by now. Read below for the full recipe and details.


Diet Soda Brownies


Ingredients
1 Box Brownie Mix

1/2 Can Diet Cola


Directions

Substitute the eggs, oil and water normally used in brownies for half a can of your favorite diet cola . -Mix with the contents of store bought brownie mix. -Make sure not to add anything to the mixture beside the half can of cola. -Grease baking pan, poor in mixture and bake according to box. Number of Servings: 12


**Tip**
You can use a box of Low Fat/Low Sugar Mix as well as an extra healthy benefit.


Enjoy
-Mr. Crafty

Happy New Year to All My Readers!

Welcome 2011! It has been quite a year with a significant amount of good and bad times for all of us. This past year has been very hectic for me. I've met so many new people that have improved my life drastically, and for that I thank them. And I'd like to also thank all of those who take the time to read my blog. I wish everyone the best and lets kick start the New Year with a positive outlook and a can-do attitude!

-Mr Crafty

Related Posts Plugin for WordPress, Blogger...