Friday, December 31, 2010

New Food Finds To Start the New Year off Right

Tis the season to be oinkers. Food is everywhere this time of year. If it's not sitting right in front of you at the table, it's shoved in your face from just about every direction you turn. Now that it's almost over, people are recovering from their food induced coma. Many of them with guilt lying on their shoulders. Those pants didn't get tighter by themselves buddy! So to ease the recovery process and help slim that tummy back down for the new year I thought I'd post a series of healthy recipes to get you back on track without feeling like your missing out on good food.


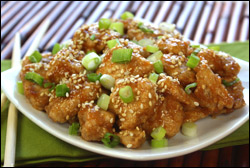
If you love takeout Chinese food, then have I got the healthy alternative for you. I stumbled upon this recipe recently and tested how good it really is and all I can say is that it comes pretty close to the real thing. It comes courtesy of a website called
Hungry Girl. It's really a good site for replacing some of the most calorie ridden foods with healthy alternatives. So here's the latest mock takeout recipe for their sesame chicken:


HG's Sweet 'n Sticky Sesame Chicken


Serving Size: 1/2 of recipe, about 1 cup
Calories: 288
Fat: 4g
Sodium: 815mg
Carbs: 24g
Fiber: 2.25g
Sugars: 6g
Protein: 37g


Ingredients:
10 oz. raw boneless skinless lean chicken breast, chopped into bite-sized pieces

1/8 tsp. salt


1/8 tsp. black pepper


1/4 cup fat-free liquid egg substitute (like Egg Beaters Original)


1/4 cup whole-wheat flour, divided


1/4 cup fat-free chicken broth


1 tbsp. cornstarch


2 tbsp. sugar-free pancake syrup


2 tbsp. seasoned rice vinegar


1 tbsp. ketchup


1/2 tbsp. lite/low-sodium soy sauce


1/2 tsp. sesame oil


1/2 tsp. crushed garlic


1 tsp. sesame seeds


2 tbsp. thinly sliced scallions


Optional: crushed red pepper


Directions:
Preheat oven to 375 degrees. Spray a baking sheet with nonstick spray and set aside.

Place chicken in a bowl, season with salt and pepper, and cover with egg substitute. Toss to coat and set aside.

Place 2 tbsp. flour in another bowl. Use a fork to transfer half of the chicken to the flour bowl, allowing excess egg substitute to drain back into the egg bowl. Thoroughly coat chicken with flour, and then transfer to the baking sheet. Wipe the bowl clean, and then repeat with remaining flour and chicken.

Bake chicken in the oven until fully cooked, about 10 minutes.

Meanwhile, to make the sauce, combine broth with cornstarch in a small nonstick pot and stir to dissolve. Add syrup, vinegar, ketchup, soy sauce, sesame oil, and garlic. Mix well and bring to medium heat on the stove. Stirring often, cook until thick enough to coat a spoon, 2 - 3 minutes. Set aside.

Place cooked chicken in a bowl, top with sauce, and toss to coat. Sprinkle with sesame seeds and scallions. If you like, add a sprinkle of red pepper flakes. Eat up!

MAKES 2 SERVINGS


What sold me on this was it's not fried like regular sesame chicken which saves a ton of calories. Best of all, the real takeout sesame chicken is almost 400 calories per serving and this recipe is less than 300 so you're saving over 100 calories a serving! So you can eat this and give yourself a pat on the back at the same time because you're on your way to a slimmer New Year! Keep a lookout for my next New Year food find in the series. Take care


-Mr. Crafty

Tuesday, December 28, 2010

How To Make Paper Roses

With Valentine's Day right around the corner, I thought I'd post a flower making tutorial early. What is better than a dozen roses sent from that special someone on V-day? I'll tell you. It's a dozen handmade roses that seem extra special to me. If you'd like to surprise someone with these handmade roses, then you've come to the right place cause I can show you how to make them quickly.

First thing's first. You're going to need a template for the flowers, not only to save time, but frustration as well because the first template can seem tedious. Once you get it done, it's smooth sailing from there. I will list the steps in making the
template below. Don't be intimidated at first sight because the design seems complex.

Step 1 - You will need some cardstock for the template
because of it's sturdiness. Next, you will need a large coffee can to trace a circle. Though a coffee can works best for this craft, you can use something else that is near the same circumference.

Step 2 - Now, you need something that is about one inch
less in diameter as the coffee can, or other can, you used in step one. Trace another circle inside the first one except align it to the left like the picture shows.
Step 3 -
Now, you are going to do a repeat and draw another circle inside the circle from step 2. Again, use something with a one inch less diameter than the circle from step 2. Now, that circle is going to be aligned right. Step 4 - Now, begin where the first two circles meet and start to draw semicircles all the way around leaving a 3 inch gap between the spot where you started and the end.
Step 5 - Ok. Now you are going to do the same
thing again but this time you are going to start where you started drawing the semicircles and then continuing onto the second circle. Use the picture below.
Step 6
- Repeat step 5 until you reach the end.
Stop at about an inch and a half away from where the second and last circle meet.End with a small circle in the middle.
Step 7 - Make a tail 4 in. long and 1 1/2 in. wide. This is going to be the inside of the rose. Refer to the picture below.
Step 8 - Cut out the template along the outer petals.


Step 9 - Continue to cut along the petals until you get to the middle where you will then cut a hole for the stem.

How to make the paper roses

You will need these items:
>Colored paper
>Pipe cleaners
>Glue
>Tape

1) Trace the pattern on the colored paper and cut it out like you did for the template. Now, by using the curling technique, slightly curl the cut out pattern by placing it between your thumb and a ruler. This is similar to when you curl ribbons using scissors. Pictures are below to show what I mean. This helps with forming the rose into a cup shape.

Before


After


2) Now take a pipe cleaner and begin to roll it around the tail of the pattern, gluing spots along the way to hold it's shape. When you get to the end, wrap the rest around and glue or tape it into place. Now you are finished! you can add some leaves to the stem or put them in a vase as is. Tip: I used glitter for some and it really emphasizes the color of the rose. Be sure to use the same color glitter as the paper for a translucent look.


-Mr. Crafty


Sunday, December 26, 2010

Ideas for Last Minute Gifts

Because the holiday season always seems so rushed, many people get gifts for others at the last possible moment. So I've decided to post a few quick crafty gifts that you can give without killing yourself over it.


Gift Baskets - Though it seems cliche', gift baskets are stilla time honored favorite last minute gift. Plus, they are fully customizable if you decide to throw it together yourself. Not to mention it can save money for you as well. I made several this holiday season as gifts filled with little treats I made myself. Along with the treats, I made little mason jars filled with the dry ingredients of a cookie mix and then printed a small recipe tag, attached it to the jar, and finished with some ribbon as an embellishment.


Bath Salts - These are great for those who are real spa buffs. Most of all, they are really easy to make. You'll need some scented oils, like lavender for example, a baking sheet for drying, some coloring, epsom salt, sea salt, and some jars or other containers to package them in. More detailed instructions can be found here


Pinecone Fire-Starters - These are great for winter gifts to friends and family who have a wood burning stove or fireplace. What you do is dip the pinecone ends into melted candle wax, allow them to dry on a hard surface, then tuck them into individual little peat pots. Tie your bows with cotton string. Each cone, pot and all, gets tossed into the firebox and acts as a wick to quick-start kindling ablaze.


These are just some of the quick ideas one can use for gift giving. Other ideas could be making a homemade garland out of dried apples and cinnamon sticks or Creating a handmade card if you're good at papercrafting. Many times, people will appreciate more that you were imaginative and gave them gifts that were sentimental.

Happy Holidays!
-Mr. Crafty

Saturday, December 25, 2010

Fluffernutter Cookies

Merry Christmas all! Behind all the shopping, traffic, and painful wallets Christmas still has it's luster. Some people more than others may find it difficult to catch it, but trust me it's there. My favorite part of Christmas isn't the presents or decorations. I live for Christmas baking. Each year I like to experiment with new recipes and test them on unsuspecting victims only to find that 9 times out of 10 it's a winner. This year I tried my hand at Gingerbread men and fluffernutter cookies.


Think of these little guys as a peanut butter and fluff sandwich packed into a oatmeal cookie. If you'd like to try your hand at making them, here's how:


Ingredients

36 tsp Marshmallow fluff, frozen
1/2 tsp baking soda
1 cup oatmeal
1 cup flour
1 cup peanut butter chips
1 egg
2 cups of Reeses peanut butter cereal, finely ground
1 stick of butter
1 cup brown sugar
1/4 cup peanut butter
1 tbsp vanilla
2 tbsp milk

Directions

1. Using a sheet tray large enough to fit in the freezer, lightly grease and scoop out the fluff into individual dollops and freeze until the final step. This helps prevent stickyness and allows you to be able to work with it.

2. Preheat oven to 350

3. In a large bowl, cream together the butter, brown sugar, and peanut butter

4. Add to that the egg, vanilla, and milk

5. In another bowl, mix the dry ingredients together and fold into wet mixture

6. shape into little balls (about 2 tbsp each)

7. Remove the frozen fluff filling and *stuff* the cookies

8. Place on foil lined baking sheet and bake for 10-12 minutes or until golden. Let stand for two minutes before serving. Makes 36 cookies.

**Note: To stuff the cookies, I make two individual disks and place one on the top and bottom of the fluff and form the ball by pinching together the dough. But if you have experience stuffing cookies, by all means use what way you're comfortable with.


And that's it! Enjoy these bad boys with a glass of milk or leave them out for Santa! Merry Christmas everyone!!!!!

Friday, December 24, 2010

Welcome!!!!

Welcome!

I’d like to welcome everyone to my blog. With a dedication to crafts, food, and the like, I wanted to publish my own creations and discoveries with hopes of becoming a resource for fellow crafters and/or foodies. Thanks for stopping by!

Related Posts Plugin for WordPress, Blogger...